Portfolio
![]()
Miscellany
![]()
![]()
My furniture making began in college as a natural
outgrowth of my formal design studies and my undirected woodworking, including
my fledgling career as a luthier. In school I had "history of the
decorative arts" introducing me to the masters, I had sculpture classes
showing me form, metal and woodworking classes showing me materials and
how to use them, and design classes showing me how to conceive and document
in two-dimension something which wants to live in three-dimension.
Really these classes were merely appetizers to my own course of study
while at university; a study which will last as long as I live.
I could classify my work by any number of means, but since history and
ethnology is time and again my starting point, I will group my work with
that mind.
Traditional Scandinavian.
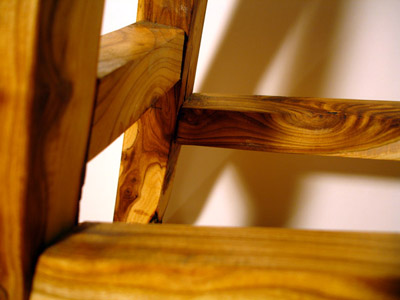
I have adopted a signature apron/stretcher detail which is found on rustic
Swedish furniture dating from the 1500's. It is a symmetrical cutout
of a broad radius sloping up to a short corner occurring at the diameter
of a half-circle crown. It is an amusing focal point on the stretchers
of several trestle-base workbenches I have made as well as table aprons
and panel-leg stools. I have chosen this idiom for my workbenches and
other hard-working utilitarian pieces for it's rational forms, heavy massing
and simple detailing.
Shaker .
The utilitarian in me is naturally drawn to this style. I have
read much about the Shakers and seen many original examples of the work.
"Hands to work, Hearts to God" has become one of my personal mottos.
I have taken the use of "local woods" and spare, "unencumbered"
detailing to new extremes. The quotations poke fun at my own desperate
acts of economy and straight-forward woodworking by using lumber-yard
pine and other off-the-shelf devices to make furniture quickly and on
the cheap which would be otherwise if I copied a piece exactly.
I have produced dining tables, workbenches and bookshelves from 2x lumber,
which after it is run through a bench planer, removing rounded corners
and, when necessary for large posts laminating the stock, produces some
fine pieces which even the educated onlooker would not divine the plebeian
source material. It was along those same lines I adapted the
famous Canterbury, New Hampshire bench. The original has turned
legs, shaped back spindles and a back rail with carved volutes.
My version has the same distinctive lobed seat shape, in pine, but is
made out of planed-to-thickness layed-up 2x. It is uncarved and
the thickened portion at the rear of the seat to accept the spindles is
achieved with a simple lamination of 1x with a beveled edge to indicate
the original carving. The legs are three pairs as the original
but, to avoid the simple yet time-consuming turning, are squared with
a stretcher in a trestle arrangement. In place of shaped spindles I have
dowel rods and the ends of the back rail are merely canted. The
end product, painted an historical shade of green, is a bench which immediately
recalls the form and utility of the original, lacking admittedly some
of the grace and proportion. But I made two of them in under 8
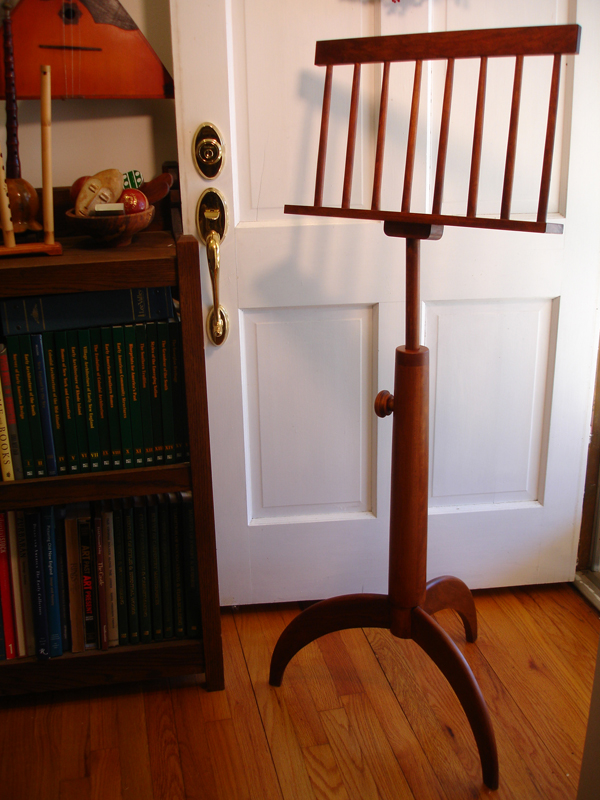
hours and it cost an insignificant amount. The following are some shots
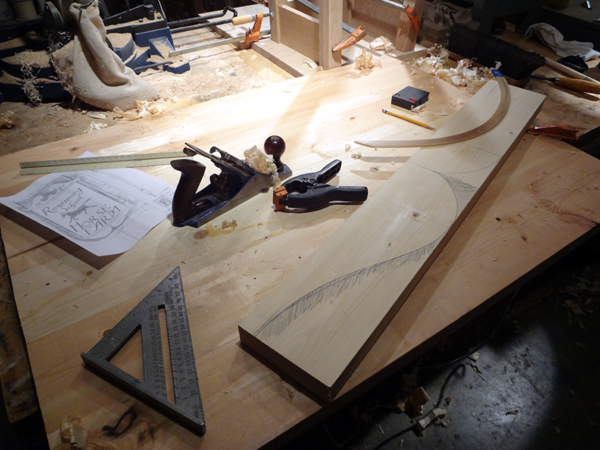
of A Shaker-themed (for they did not play instruments) music stand I made
from the Thomas Moser pattern. The base is recognizeable as the famous
side table stand modified with splayed legs for the approach of seated
musician.
.jpg)
.jpg)
.jpg)
.jpg)
.jpg)
.jpg)
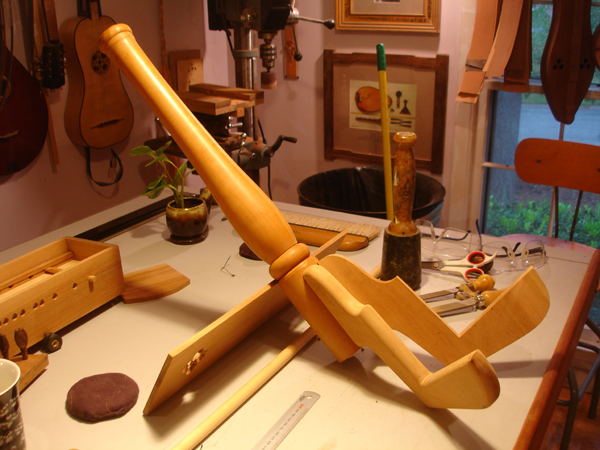
And now for something completely the same. . .
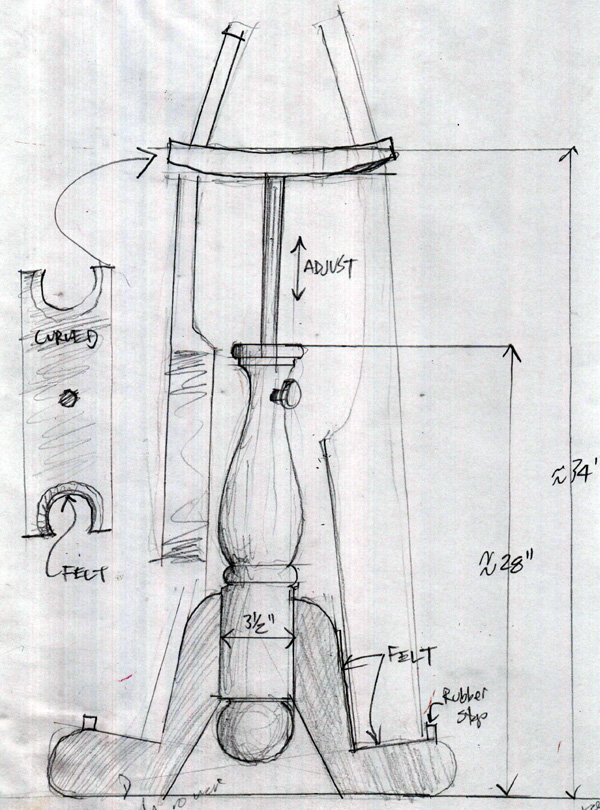
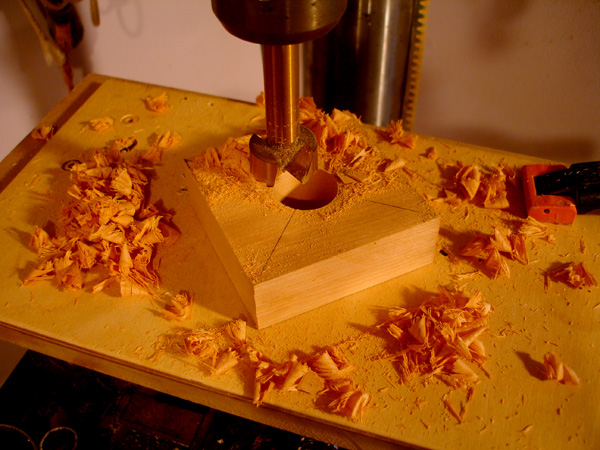
My design for a dual instrument stand with the same adjustable wooden dowel arrangement. Have you noticed that all the stringed instrument stands available out there are either splindly black powdercoated aluminum or spindly new-age-y bent wood? I did! At last a music stand that fits with your button-down, traditional lifestyle. Give your classical guitar a classical home.
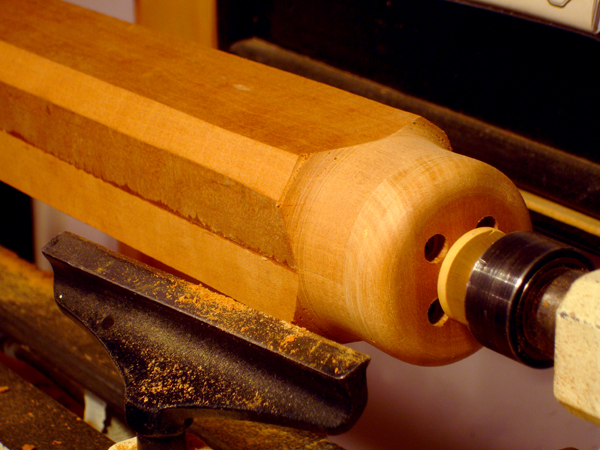
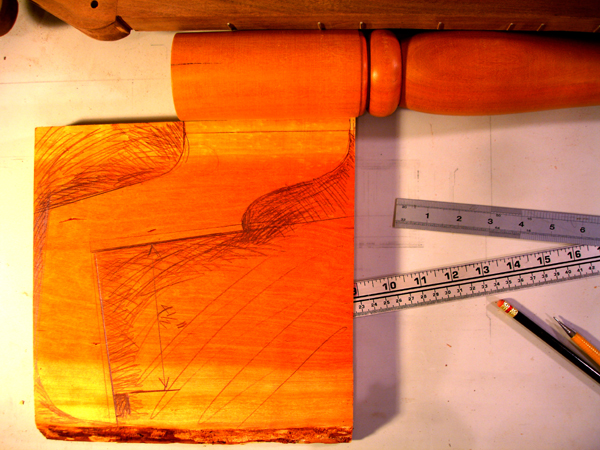
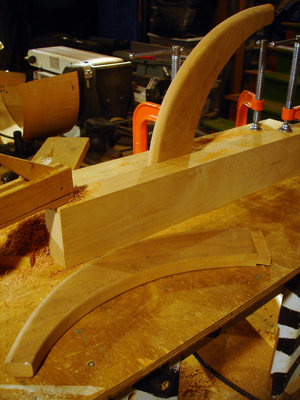
As with the music stand, the instrument stand has a cap screwed to the top of the hollow shaft to conceal the end grain and square interior profile. (right) I'm fine tuning the leg shape on the wood blank.
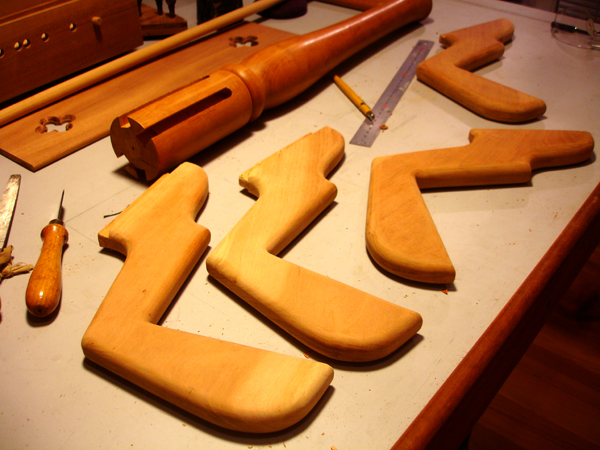
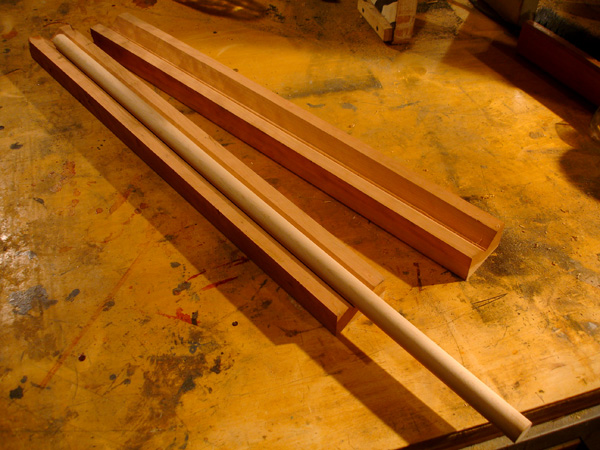
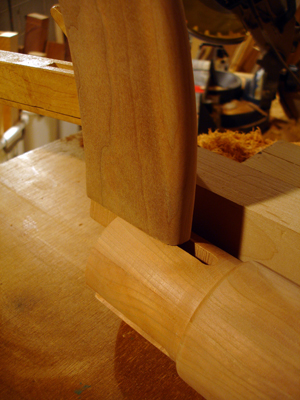
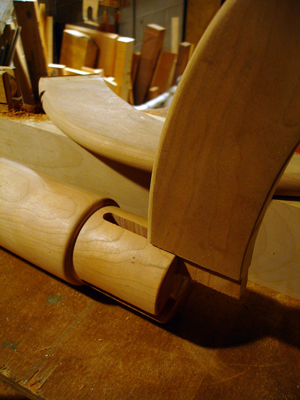
Dryfit of the legs and (right) the legs with full roundover, showing the full dovetail tenons.
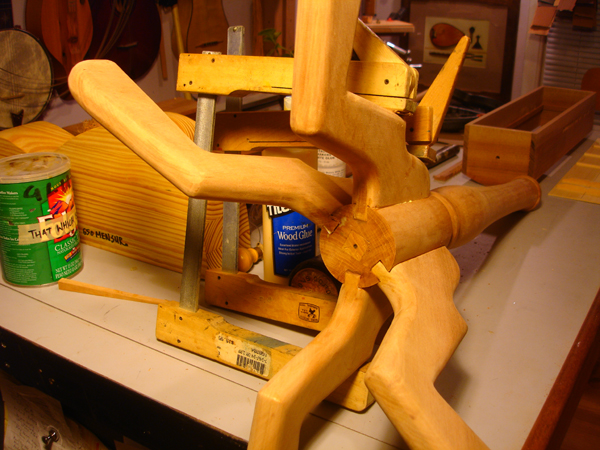
I'm pretty sure this is how Chippendale did it.

With a rubbed-out, waxed finish to complement antique instruments.
++++++
Ok, This project isn't really Shaker. . .it's a simplification of a Spanish Renaissance piece. . .but it reminds me of the very plain Shaker case pieces.
Sunday, June 1, 2014
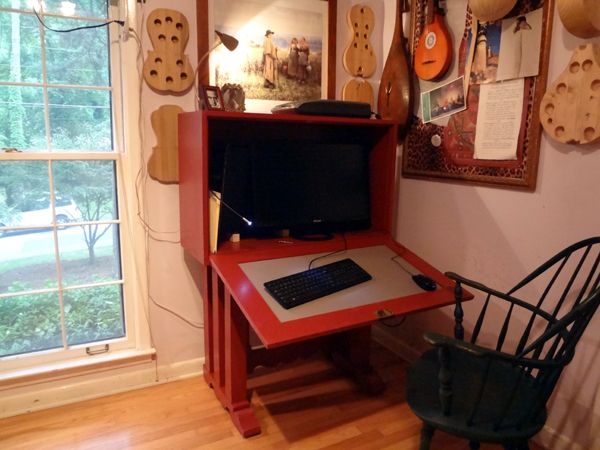

Monday,May 26, 2014
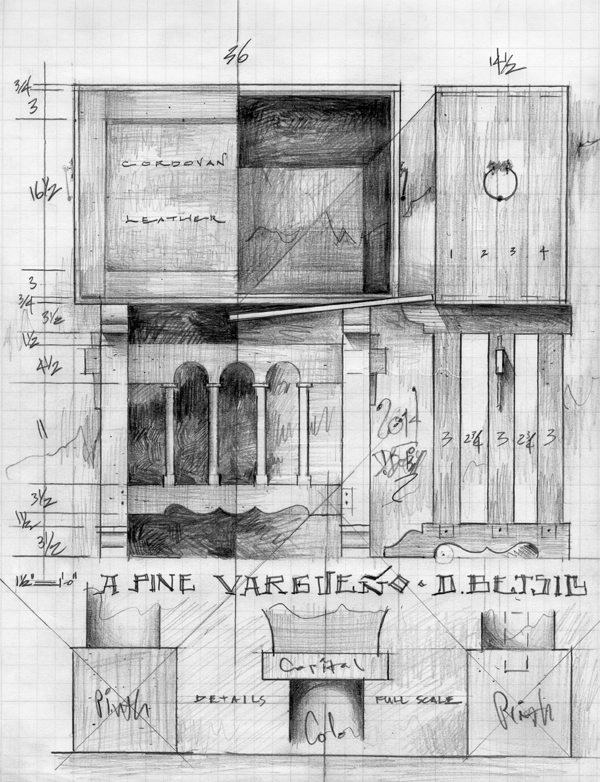
My new home office requires a desk. I finally have a reason to make one of these Spanish Renaissance chest-desks. The front panel folds down to be the writing surface and interior is usually filled with a warren of highly decorated drawers. My interior will be open to fill with monitor and tower. The base is greatly simplified, opposed to the barley twist turnings and carvings of the originals. This is another one of my patented 2x4-made-in-a-day projects.
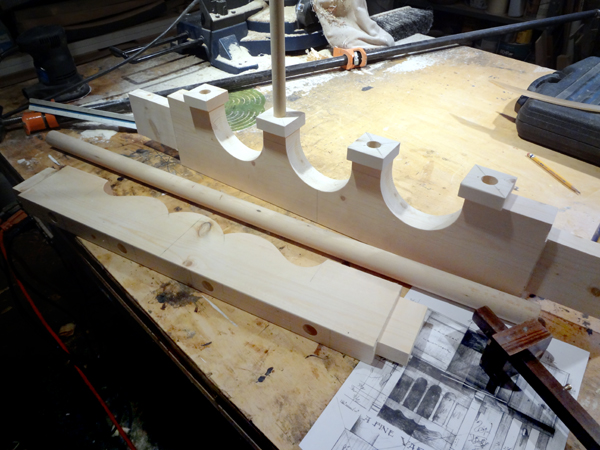
The rails of the base are profiled and tapped for dowels that will hold the columns in place.
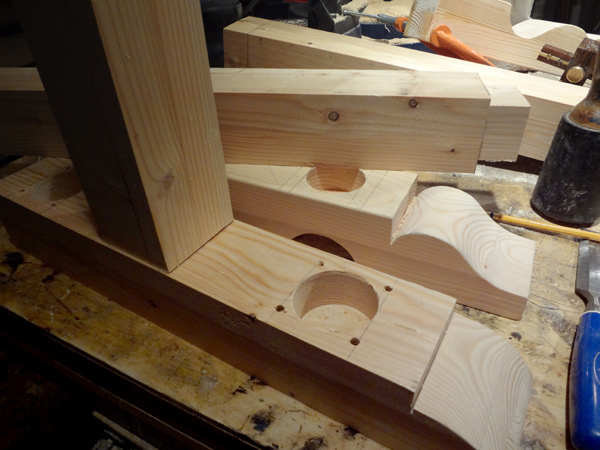
Shortcut tip: drill out the corners of the mortise to help prevent splits when chiseling the mortise square.
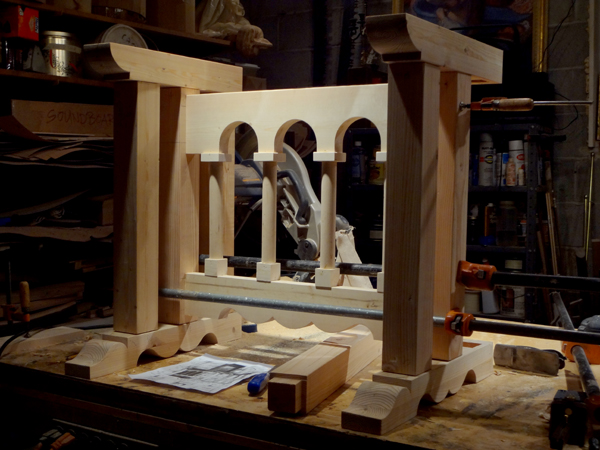
The base getting a test fit before glue-up. each tenon will be pinned with a 1/4" dowel
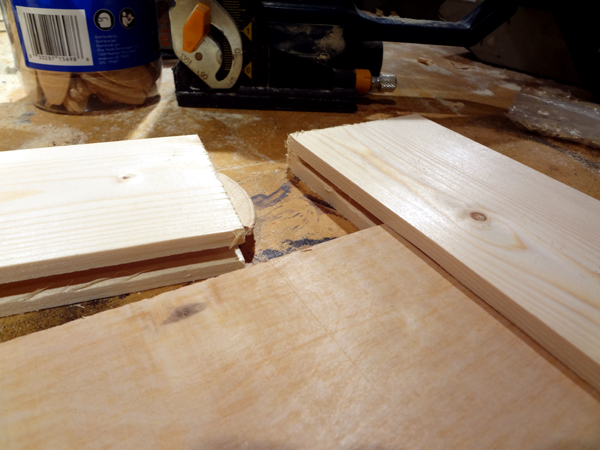
The down-and-dirty way to make a flat panel assembly: run the grooves on the table saw, stopping short of each end so as not to expose the cut on the ends, then using a biscuit. The joint can be further reinforced by tapping a small dowel through each end of the biscuit like a pinned tenon.
++++++
Gothic
Revival, Edwardian, and English Arts and Crafts.
Distinct styles, but lumped together by my own meddling. I have
produced a suite of office-type furniture out of oak, stained dark, which
lifts forms, details and mechanical curiosities from this quadrant of
19 th c. England. I am as close a follower of William Morris as
I dare without being a card-carrying Socialist. I am currently reading
the two volumes of his collected letters and being confirmed in what I've
believed all along: That the products of our craftspeople can speak loudest
of all about the spiritual health of our society. And that era! Dolmetch
at Halesmere breaking the dawn of the early music revival along with the
Pre-raphaelites drawing back the dark drapery covering antiquity revealing
new vibrant colors. The age of Whistler and Ruskin, when a man could be
both Statesman and Artist and the line between could be indistinguishable.
The designer in me is mesmerize by the baroquely-cluttered Edwardian interiors,
with every available surface embellished and every space occupied, not
disordered but with a complex harmony, one object playing off the other
to tell the story of the inhabitant. My spaces are like this.
The following are a few images of a mailbox I'm making with classical features.
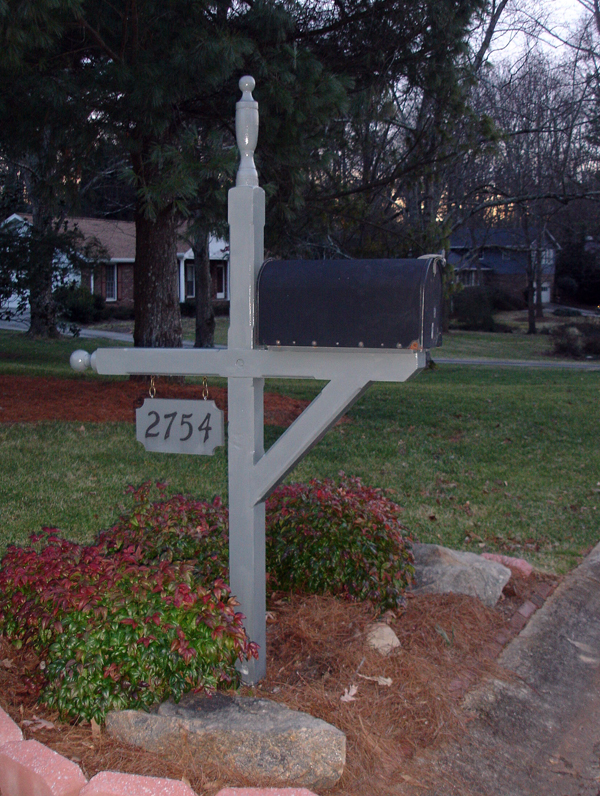
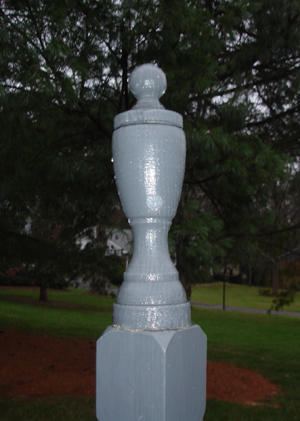
Installed. Pictures unfortunatily taken on a rainy day.
++++++
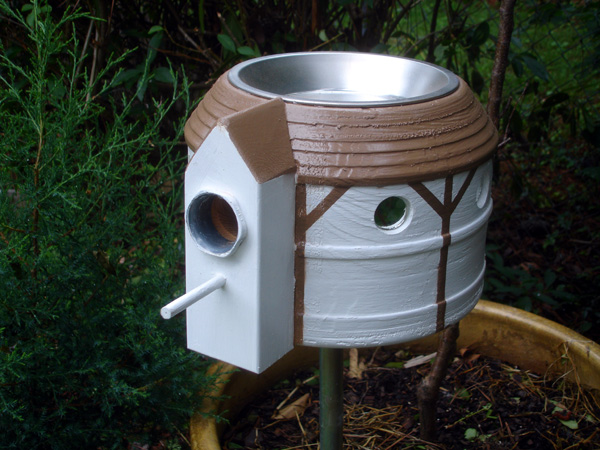
A birdhouse in the shape of the Globe Theatre for Shannon's Shakespere garden at the Art Station in Stone Mountain Village.
++++++
The following are some images of a "Victorian TV Stand" which I patterned after a piece by Owen Jones from 1860. If the Victorians watched flat-screen TVs, they would sit on something like this. ""That's Steampunk! ! !""
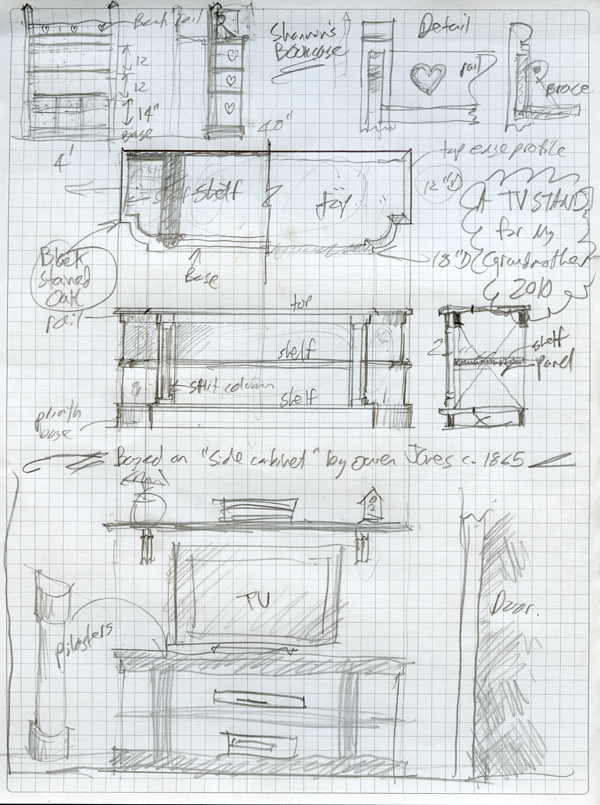
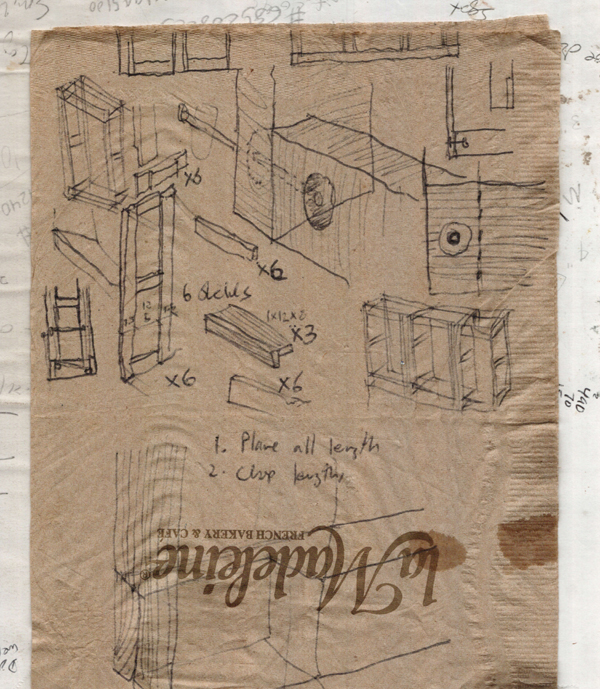
The drawing, including a bookcase I made about the same time.
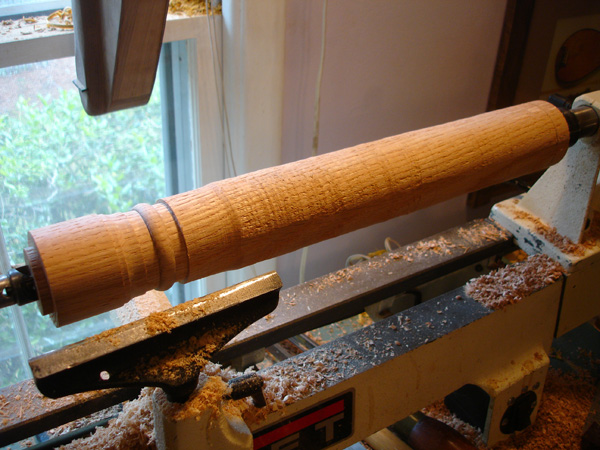
Start with the most fun part first: turning the split pilasters for the front. Choosing a typically Victorian, vaguely-Classical but completely nonsensical profile.

Progress on the carcass construction.
.jpg)
This project was my excuse to finally build a steambox [That's Steampunk! ! !]. I was aquatinted with this contraption from my Windsor Chairmaking workshop, but it's taken me about 10 years to get around to making one. I purloined our garment steamer which conveniently plugged into my PVC reduction coupling. I'm bending 3/8"thick ash for the radiused corners. Note piece clamped in form to the left.
.jpg)
This project was also a lesson in squaring routed inside corners.
.jpg)
Moderately successful.
.jpg)
Leaving the hard part for last: complete except for the radiused corners. The top is not actually attached at this point.
.jpg)
Corners in place. About to attach the top
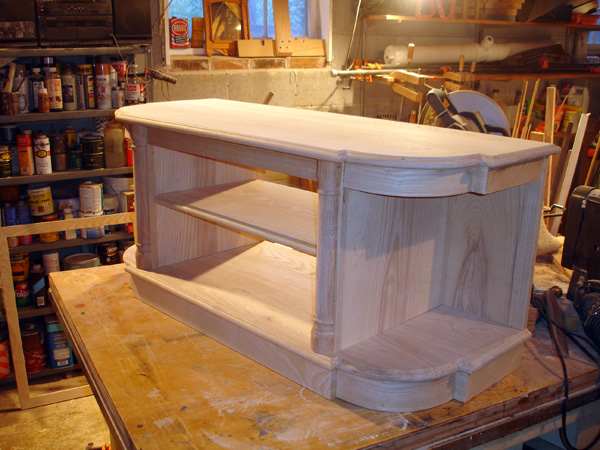
Ready for finishing.
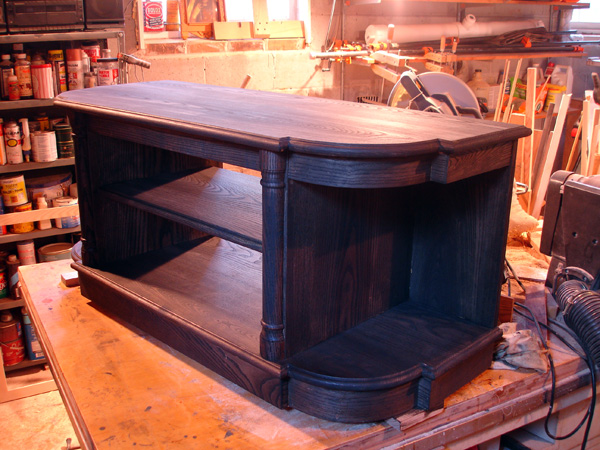
Black!! I'm matching the finish of an existing bracketed shelf that's going to be above it. The shelf was the inspiration for the style choice. Two coats of lacquer and we're done.
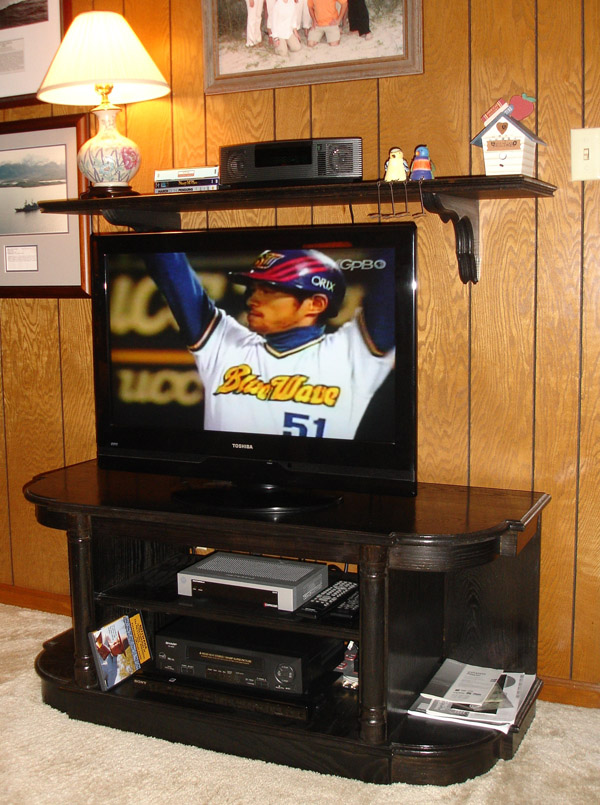
In situ. Huzzah!
++++++

The feet for a victorian-styled museum display case out of mystery wood
Some pedestals for use inside the case out of poplar

The completed case with 1-piece acrylic top. I put the oak sticking on the corners to simulate the individulal panes of the original.
++++++
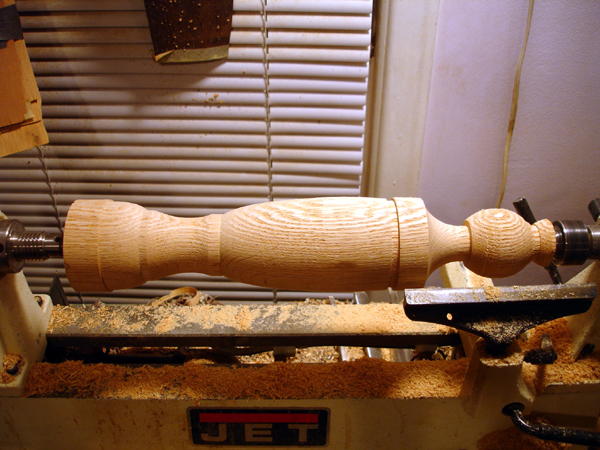
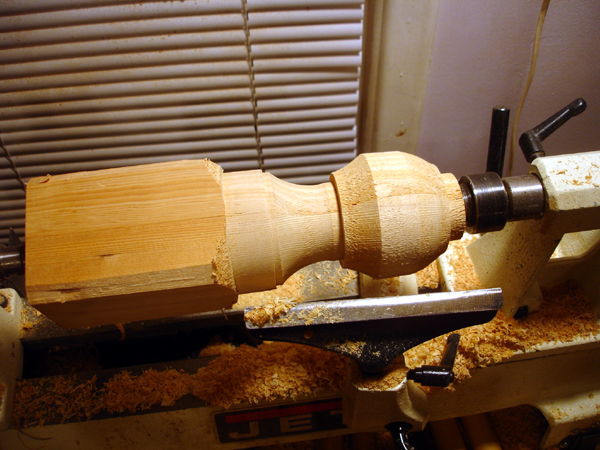
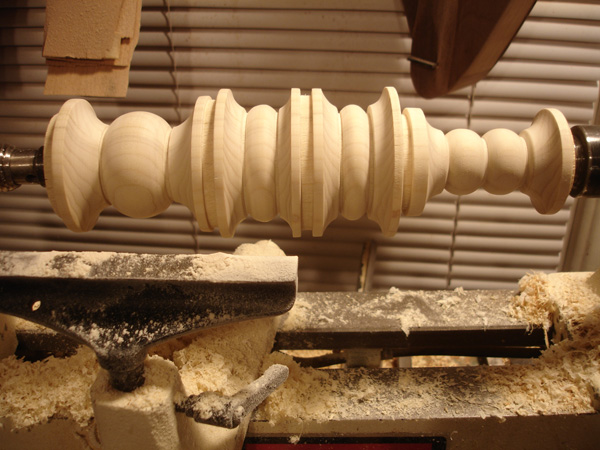
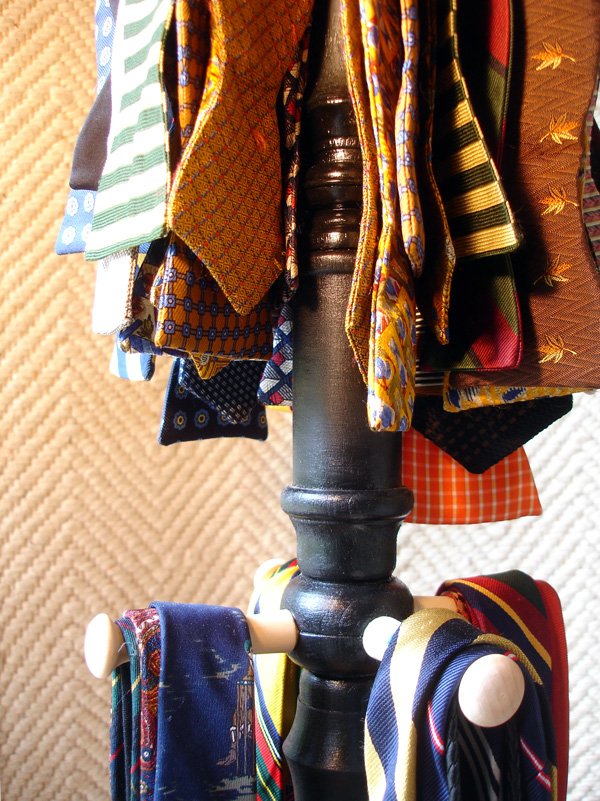
A Victorian tie stand. . .
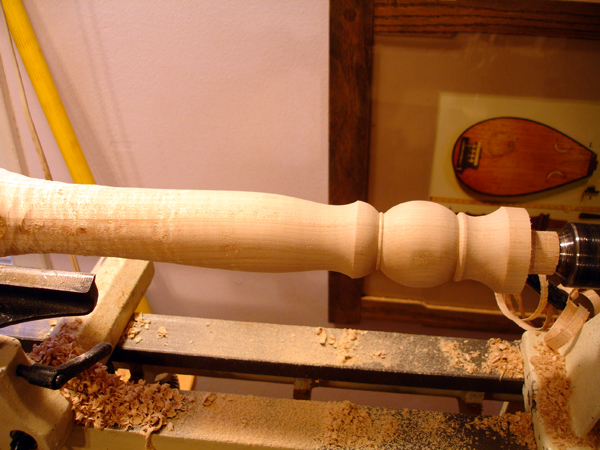
Slowly I turn. . .
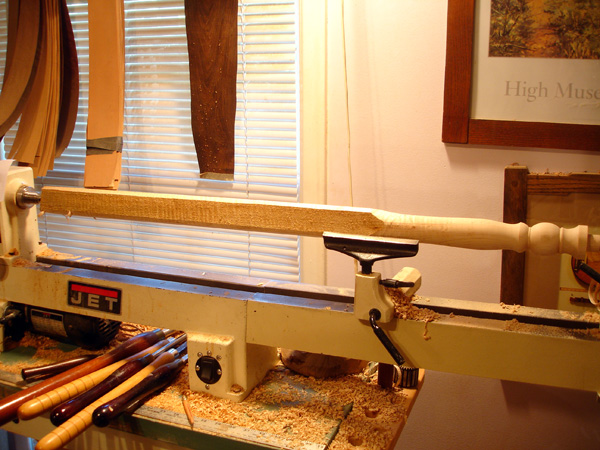
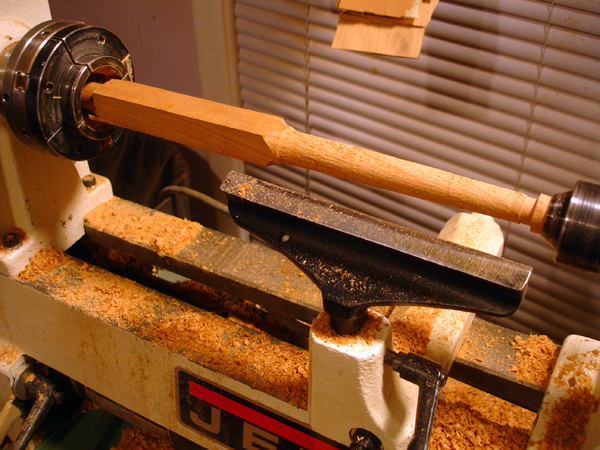
. . .very slowly. 520 rpm to be exact. The length of this piece (about 40") means deflection is a big problem. This is going to be a floor-standing necktie stand.
++++++
An Eastlake-inspired bookcase in ebonized ash for Shannon. . .

++++++
A library table in the style of William Morris. . .
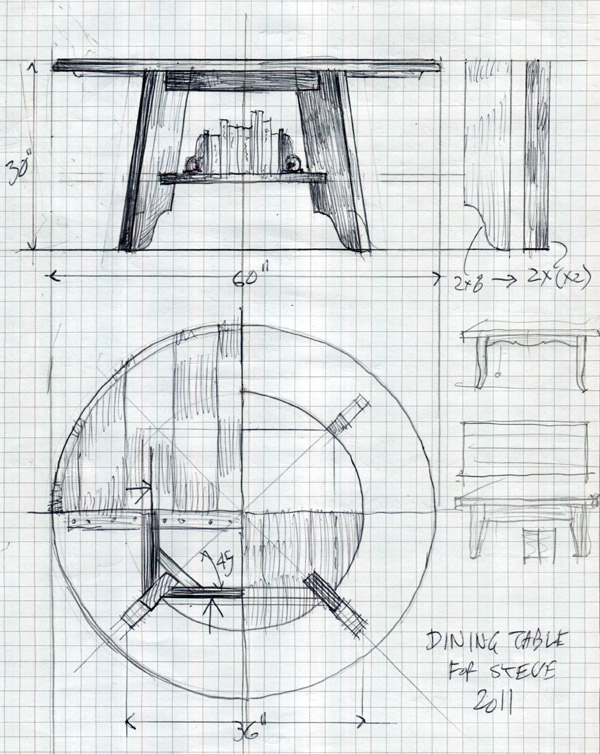
I've designed this from memory of a table that's in the scullery of Kelmscott.
.JPG)
.jpg)
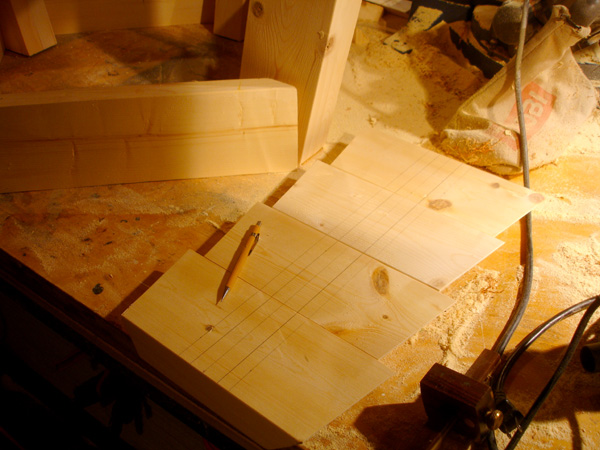
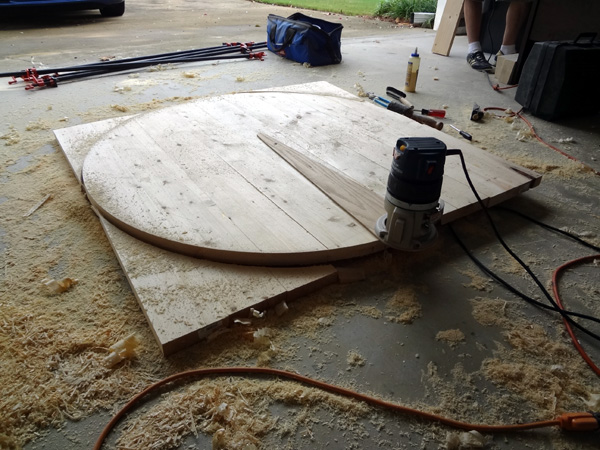
The legs are splayed and set at 45-degrees to the rails. The lower shelf is layed up to the left. (right) This came to me in a dream. I may have stolen it from somewhere. How to cut a perfectly round shelf with a router.
.jpg)
.jpg)
It takes two passes to trim the full 1 1/2" thickness of the shelf. (right) One of the legs in place in a notch cut into the shelf. The top is partially finished in the foreground with an eased edge.
This project needed to be made with the absolute minimal cost (the entire table is made form laminated and planed 2x6 lumber) but also needed to be made quickly as I have several other commissions going on at the same time. So in my engineering I came up with this simple method of joining the rails to the legs with hidden cleats, avoiding time consuming angled mortise and tenon joints. These braces are compound mitered to lie flat against the inside of the leg and pulled to the rails by interior pocket screws.
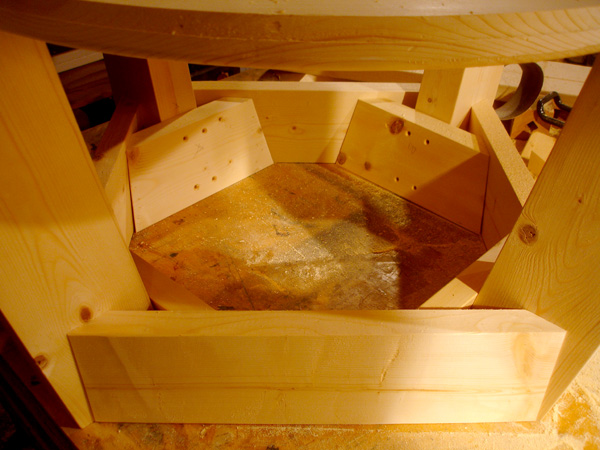
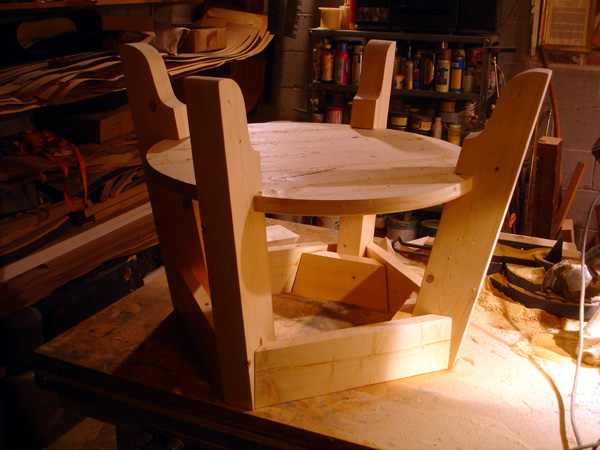
Showing the cleats in place with holes tapped to attach to the inside of each leg. (right) Dry fitting the table base. The top will be round and trimmed the same way as the top.
The top is shaped in the same manner as the shelf. (right) with the shelf finished I'm pocket screwing it to the legs first to give stability for attaching the rails.
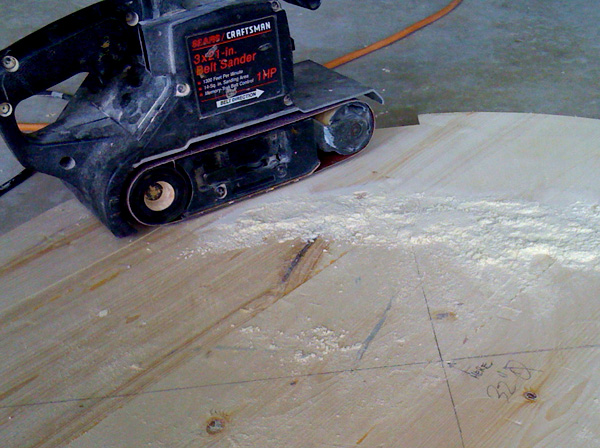
I have found in making many a table top from edge glued 2x material that using biscuits to align the pieces is a waste of time and doesn't really add strength to the joint. Yellow glue spread fully across the edge is after all - so they claim - a bond stronger than the wood itself. Not using biscuits to align the pieces does mean that after pulling the clamps off there is some clean up with the belt sander. But this takes half the time of setting up all the biscuits. Visible in this shot is the center pivot point for my router jig, slightly off from the cross.
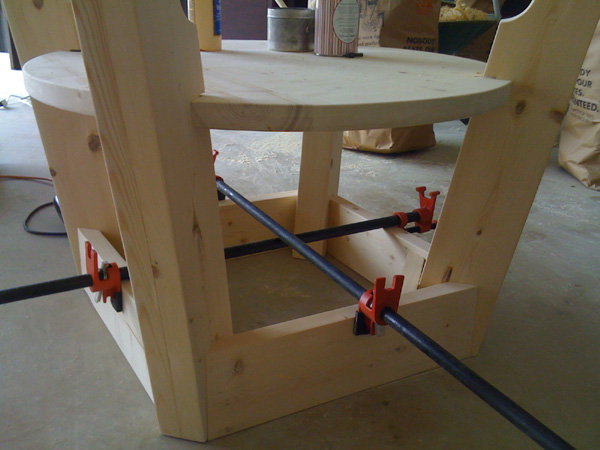

Dry clamping the rails in place to make sure the rails are the right length to set just behind the upper edge of the splayed legs. (right) the base and top are complete. This is all 2x6 lumber!
The assembeled table 'in the white'.

++++++
A coat rack with tapered octagonal shaft of Scottish Arts inspiration. . .
.jpg)
.jpg)
.jpg)
.jpg)
.jpg)
.jpg)
.jpg)
.jpg)

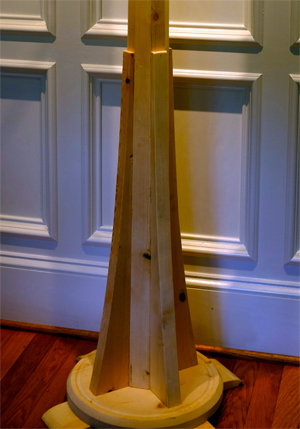
Unfortunatly the piece got 'installed' before I had a chance to take proper pictures and the space doesn't allow us to photograph the whole piece at once
++++++
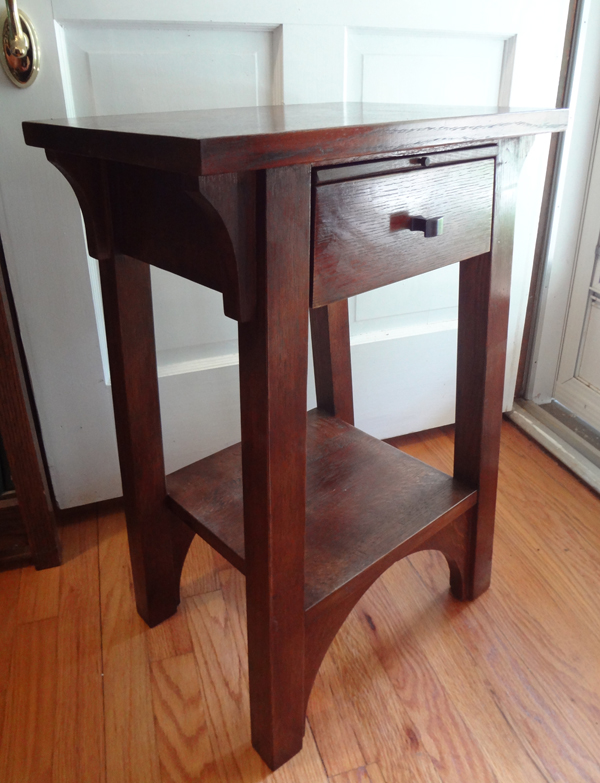
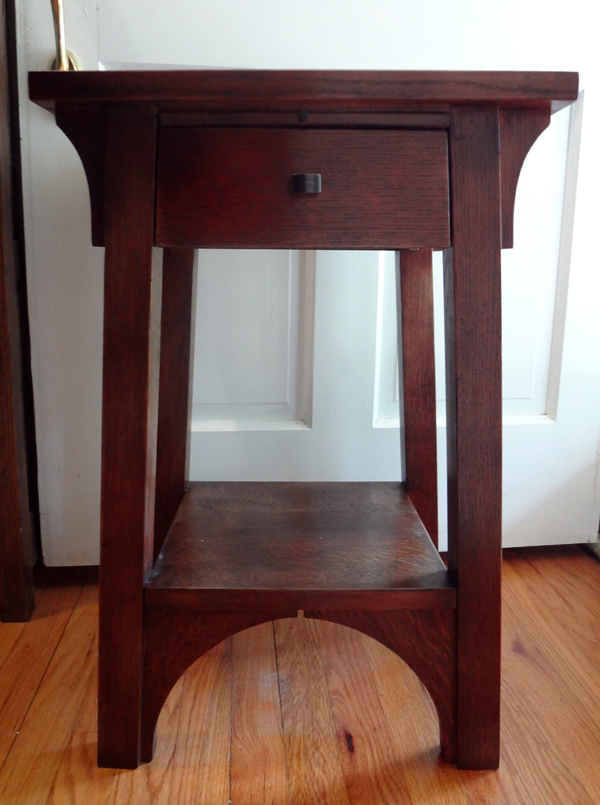
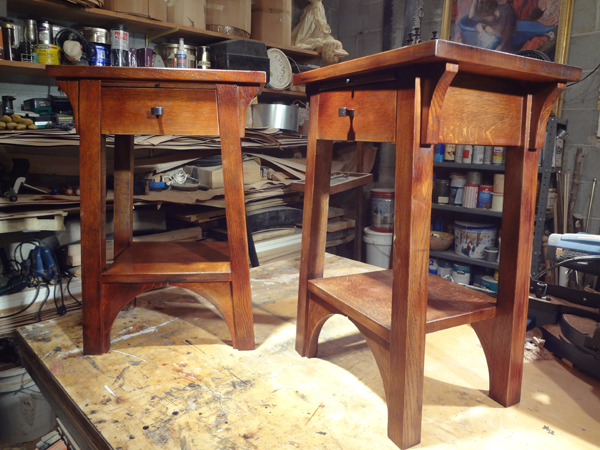
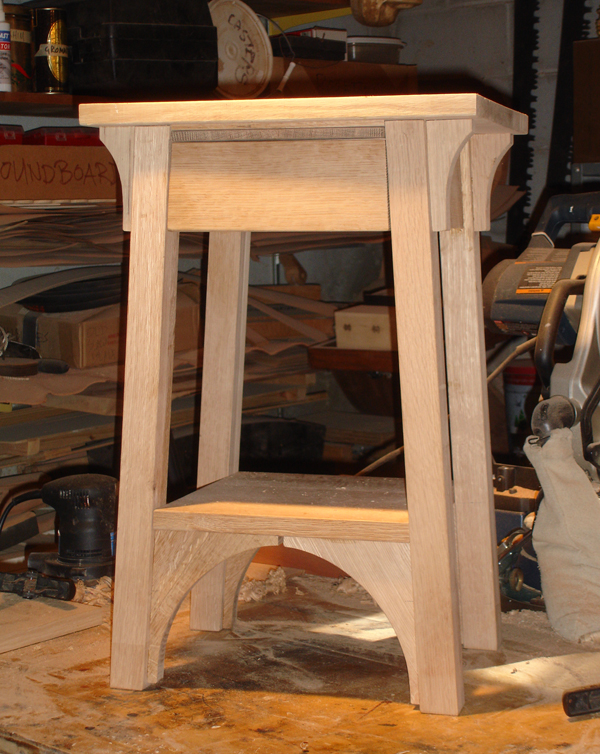
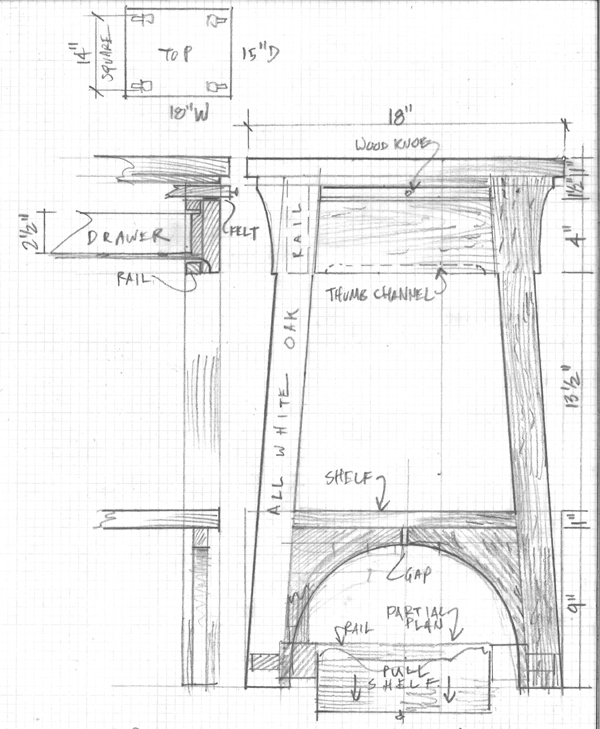
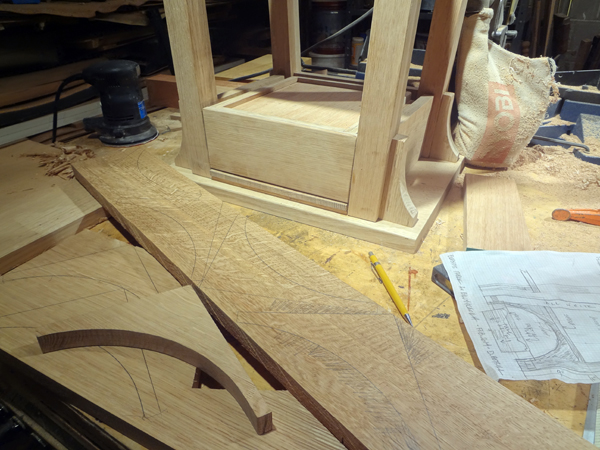
Below, a pair of Arts-and-Crafts end tables with pull-out shelves


Sunday,May 4, 2014
A general view of work on two Arts-and -Crafts bedside tables for my friends Billy and Cecillia. They have to be finished before the baby arrives. I don't know how I'm going to get these to St. Louis.
++++++
Bauhaus.
It hit in High School. It hit hard and stayed with me through
college, and I am still haunted by that Kaiser's cavalryman. If
I could go back in time and sit down to tea with one person it would either
be Gandhi or Walter Gropius. "What were you thinking???"
would be the first question. Considering the exciting yet Victorian
climate of Weimar Germany, the proto-hippy commune ideas behind Gropius'
school make its appearance downright shocking. Ideas which 80 years later
are still considered edgy and much philosophized. Tubular steel does not
have much of a place in a woodworker's studio, but much of the way I look
at the chair, a machine for sitting, comes from Breuer and Loos and Moser,
and Mies. I drew a straight line from Provençal pre-industrial
revolution furniture, through the Arts and Crafts movement in the 19 th
.c to the Bauhaus. The common thread is form follows function. No element
of the design exists unless if contributes to the larger function. No
curve is made for the benefit of the eye that is not sanctioned by the
structure. Carving and embellishment is an anathema pronounced by the
raw material itself.
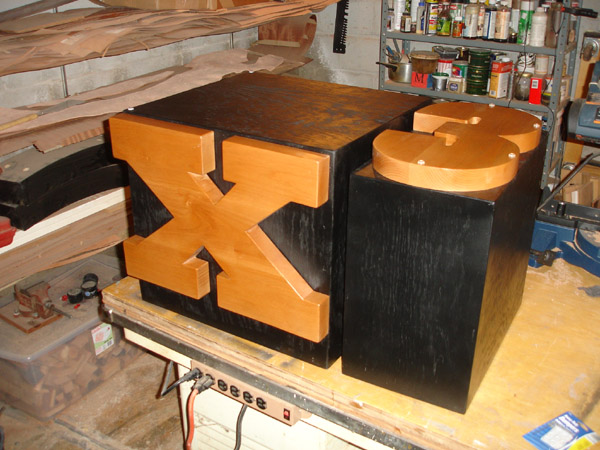
This coffee table I made for a local graphic design firm (the glass top is not in place) reminds me of the bauhaus penchant for supergraphics. These were actually meant to resemble over-sized printer's blocks.
++++++
A project that is a little more modern than usual. . .and Bauhaus in as much as it's a deceptively simple design which required way-too-much hand craftsmanship to be economically feasible as a mass-produced product for the people. Glad I only had to make one.
Friday, May 5, 2017
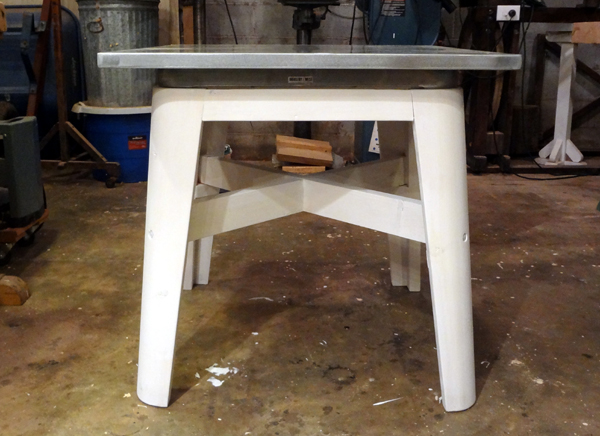
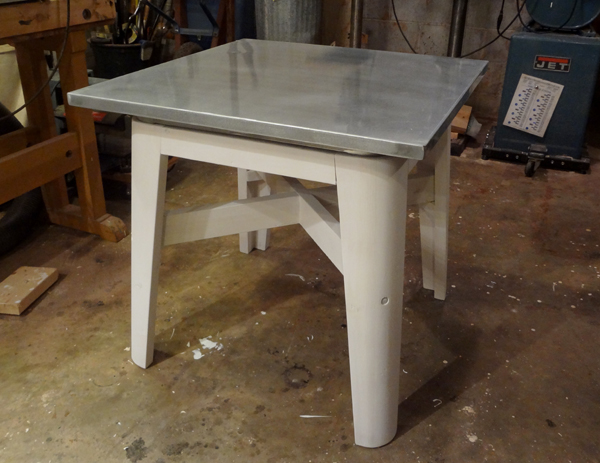
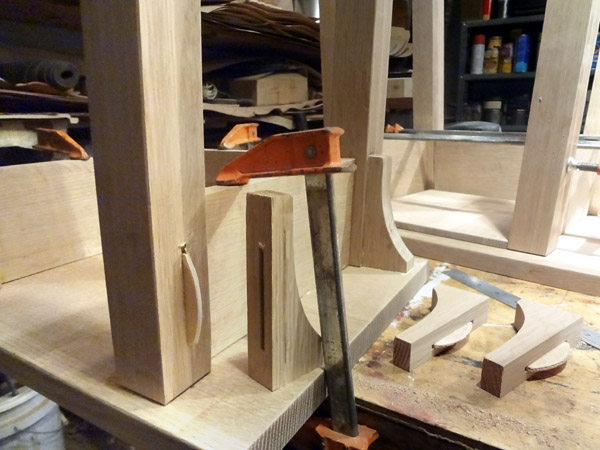
At long last some time in the worksop and a new posting. A friend of mine gave me the metal table top and i made a base inspired by the original which was in metal. The original had these tapering, curved legs which are easy enough to replicate in wood but I found that assembling it was the challenge as there are no square edges or right angles to effectivly clamp. The key was using lag bolts to pull the legs into the x-brace. Makes a nice little industrial nod to the original too. This is Killz to hide the pine knots. i'll paint it a bright color TBD. Below is the process of making the legs.
.jpg)
.jpg)
.jpg)
.jpg)
.jpg)
.jpg)
.jpg)
.jpg)
And below the making of the half-lap x-brace
.jpg)
.jpg)
.jpg)
.jpg)
++++++
An otherwise unremarkable project save for the need to make a 3-sided miter. Challenging. I had mroe fun making the van dyke finish and antiquing the lead holder I drew with.
Sunday, July 17, 2015
.jpg)
Working on a walnut shelf with a built-up construction to get an overall 4" thickness without the weight of a solid piece of wood. First step: create distressed finish with mirror shine for new lead holder. Instant history.
.jpg)
The shelf and a similarly constructed backplate is the visual substrate for an antique decorative cast iron coal burning fireplace surround with an angled apron at top.
.jpg)
After resawing 4/4 walnut planks I'm having to make a 3-edged miter. This is not easy, especially when the long pieces warped after making the cut.
.jpg)
++++++
American colonial.
I have admired the work at Williamsburg since my visit there
as a youngster and harbor the dream of being a journeyman in the same
cabinet shop that produced those wonderful 18th c. harpsichords. My 30th
birthday present to myself was attending a three-day workshop by a visiting
Colonial chair maker, whom I met at the Yellow Daisy Festival at Stone
Mountain Park. (An entertaining event known more for crafty crap than
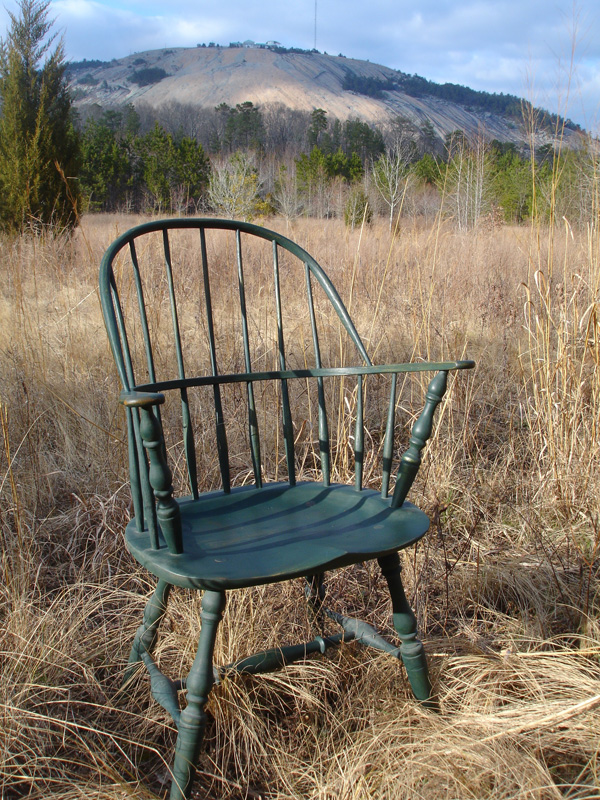
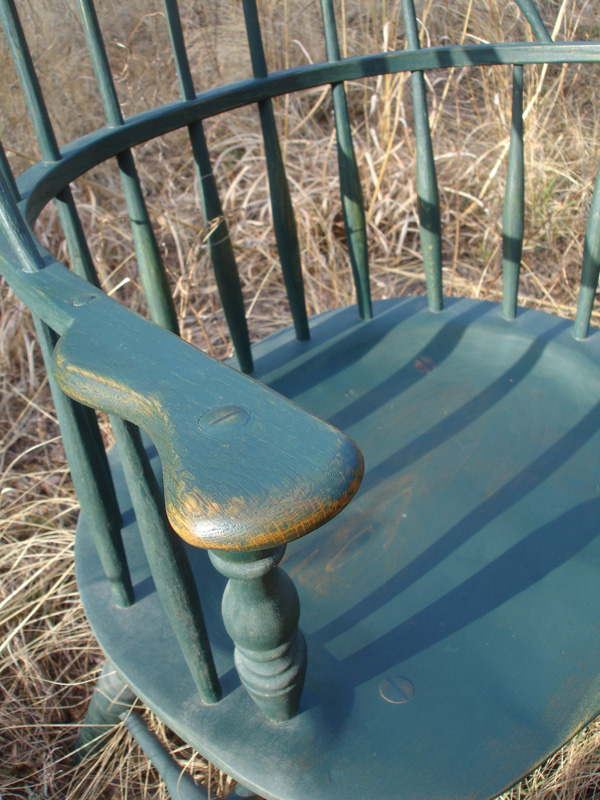
fine craftspeople) The project was a "sack-back" windsor chair.
I had read much about this piece of furniture and the craftsmen of the
American Colonial period have always captivated my imagination. This was
a traditionalist maker and we got the top-to-bottom education, excluding
only the turning of the legs for time constraint reasons (a skill I already
possessed anyhow) and the steam bending of the hoops (an apparatus I intend
to construct for my next chair) Perhaps most satisfying was learning how
to use an adz and travisher to scoop out the seat. Most of my work in
this style has been at the library, however besides the chair I have made
several wall-hung bookshelves of the scalloped-panel variety. One ongoing
project is a series of turned walking staffs based on colonial examples.
I intend to make another trip to the Smithsonian collection in the near
future to their excellent costume division.
Proud resident of Stone Mountian, GA!
.jpg)
A replica of a cradle dating from the mid-to-late 17thc. in the Bolduc House, St Genevieve, Missouri. Page for the project here
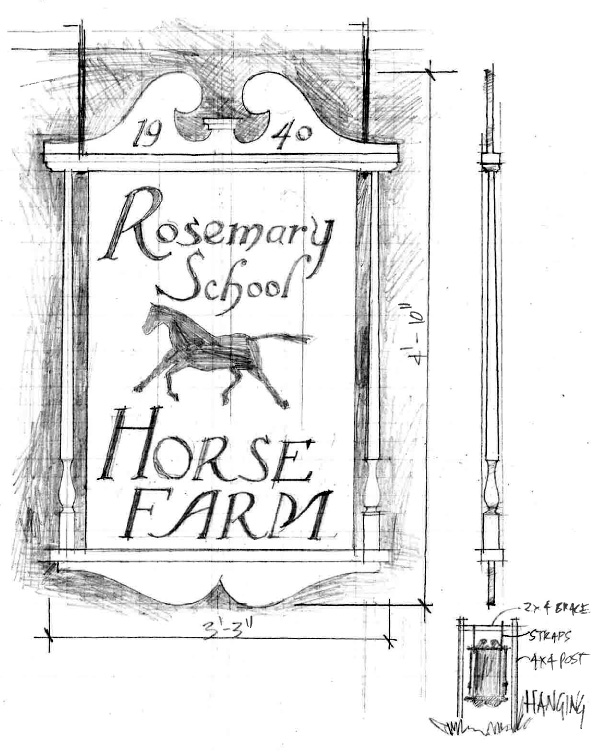
Above and following, a sign design for my aunt's horse farm, based on early American tavern signs.
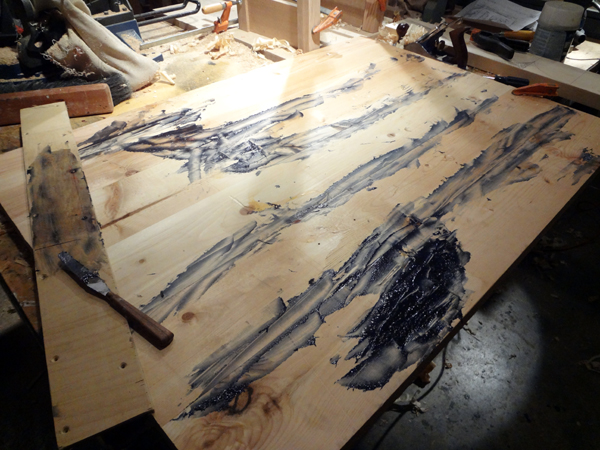
Made mostly out of 2x6, so having to bondo all the checks and knots.
.JPG) Making
a bedmold out of two pieces of 1x
Making
a bedmold out of two pieces of 1x
.JPG)
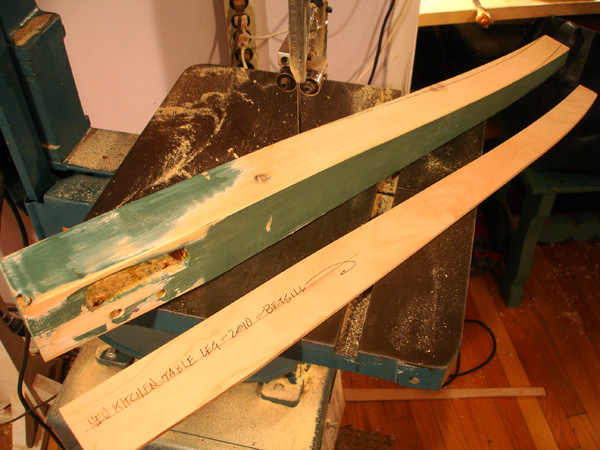
.JPG) 2x10
extreme makeover. If I was making more of these I would make a plywood
template. But since this is a one-off project I just freehand the shape
right on the wood then trace the cutout and paste it on the mirror condition
to cut the same shape.
2x10
extreme makeover. If I was making more of these I would make a plywood
template. But since this is a one-off project I just freehand the shape
right on the wood then trace the cutout and paste it on the mirror condition
to cut the same shape.
.JPG)
.JPG)
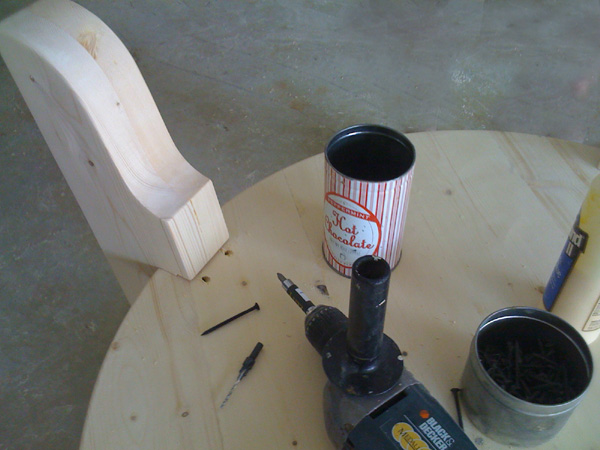
Since this is an exterior sign I'm taking every precaution to make it weatherable. Here I'm tapping 3" galvanized deck screws into the bottom of each spindle even though there's a pin holding it in place.
.JPG)
The assembled sign prior to sanding and painting.

A turned candle sconce repurposing some cheap brass arms form a Pier 1 fixture.
++++++
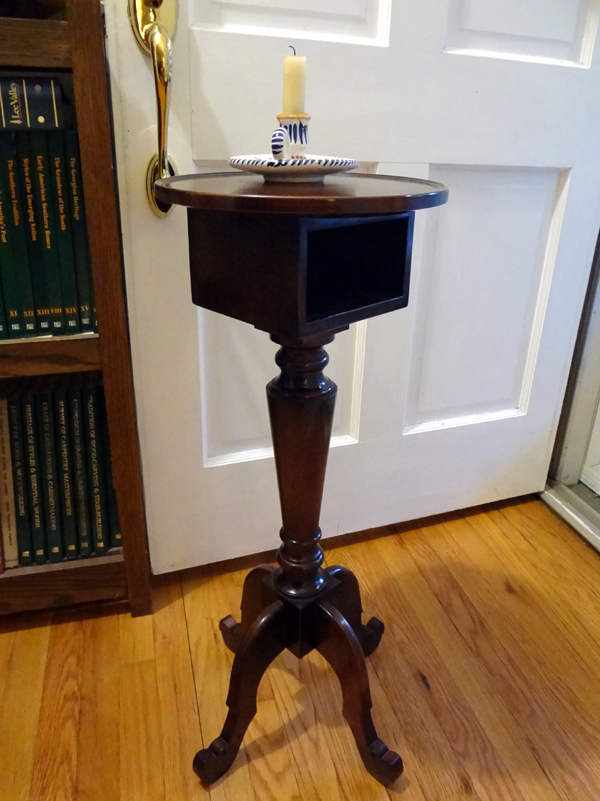
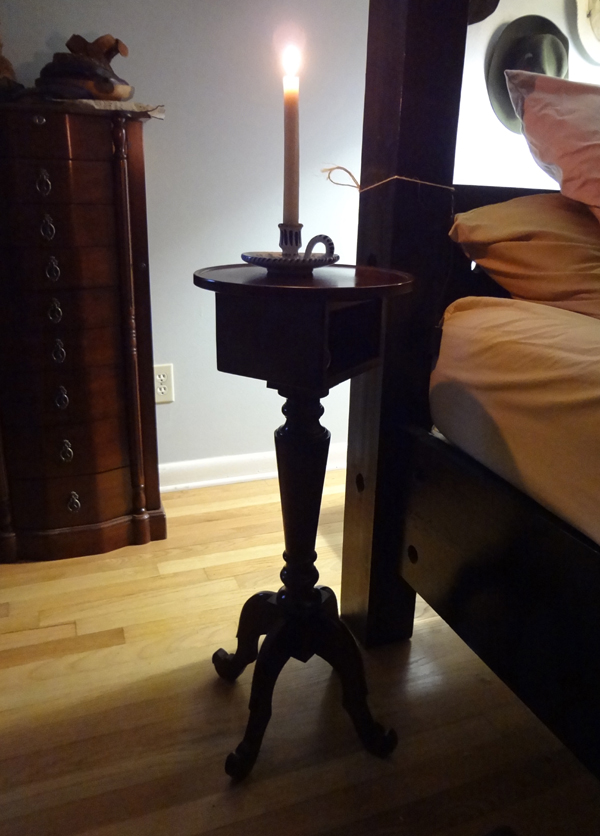
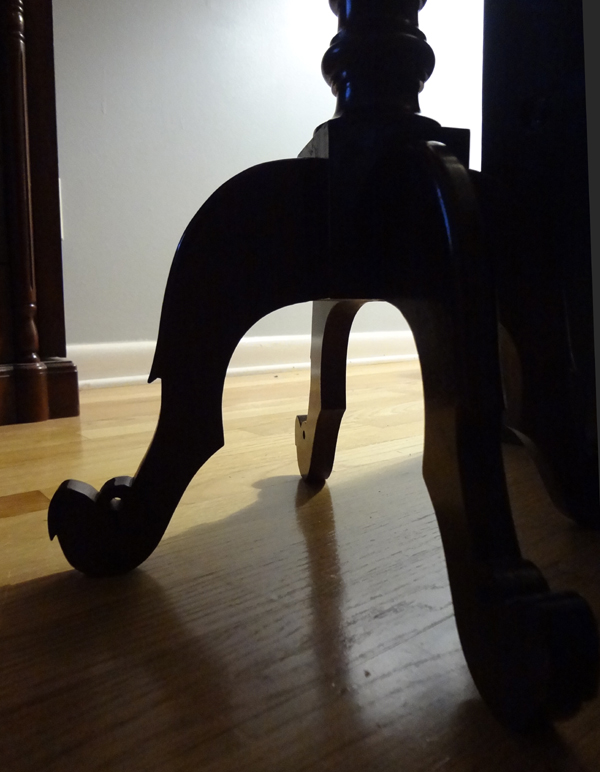
A better picture of the candle stand, AKA Shannon's bedside table.
++++++
Sunday, April 27, 2014
Work on the candlestand is complete. Two atmospheric evening shots in-situ. The top box wound up being taller which made the legs shorter than drawn to keep the piece at 30". And I went with the turtle instead of the bird.
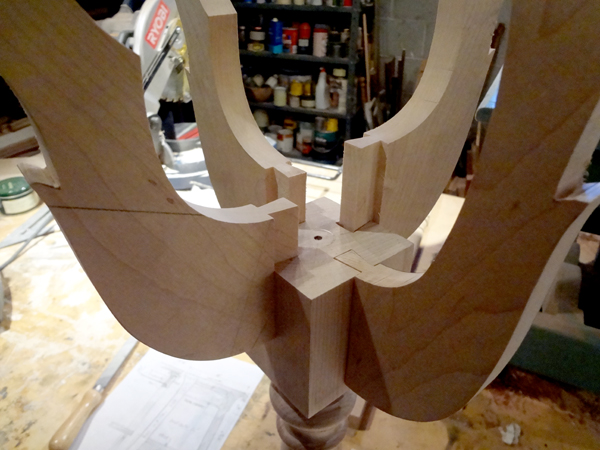
Fitting the dovetalis. Ryobi product placement.
++++++
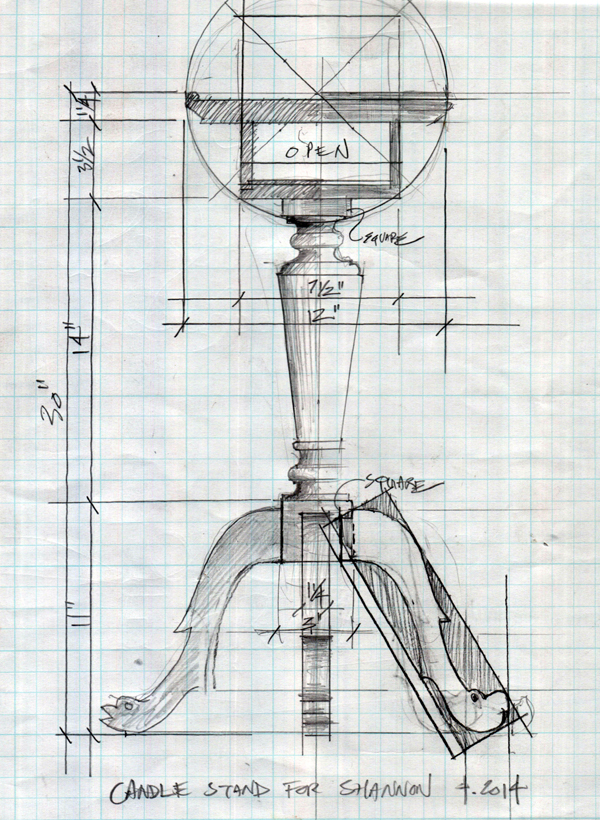
Tuesday,April 22, 2014

A Williamsburg-inspired candle stand in progress. David Byrne looks on.
++++++
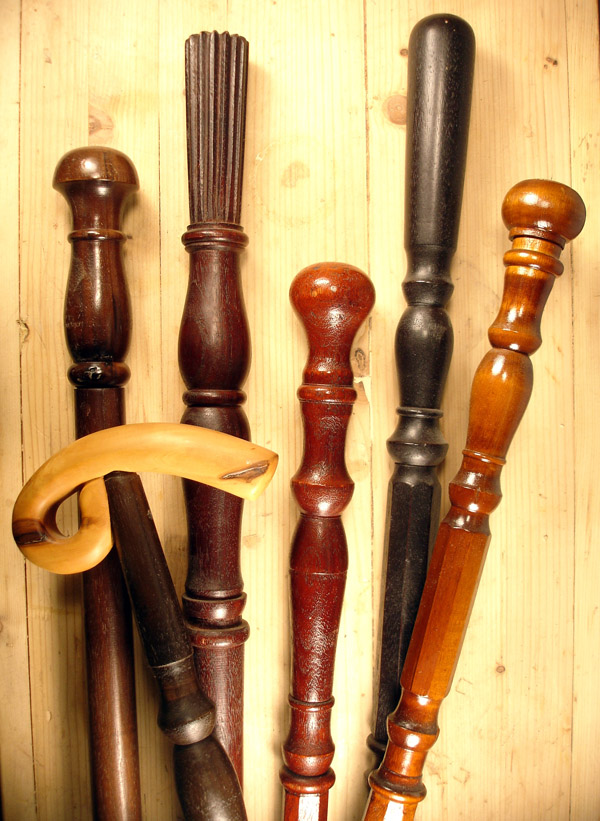
My walking sticks now have their own page here
Bowl Surgery.
On the lighter side is my bowl making. After years of just spindle
turning I got into bowls through an unlikly source. I volunteered at an
Episcopal mission in downtown atlanta run by one of the ex-bishops of
the diocese. We taught the neighborhood kids how to turn bowls, pens,
and do other woodworking projects. So i learned bowl turning from a bishop.
Turning a big chunk of wood with a huge gouge and shavings flying everywhere
is a great release after hunching over tiny lute pegs for 8 hours. I always
use wood with a story. My first series of bowls were made from a red maple
tree that fell in Olmstead Park from a storm. It was certainly planted
by Olmstead 100 years ago. I now have a dedicated
page for my bowl making.

.jpg)
Tribal.
I've always loved the honest, practical craftsmanship found in
the far flung corners of the Realm. Lines are not straight, finish maybe
a little rough, things don't quite line up. . .but these pieces are sturdy
(often well over engineered) and beautiful to look at. And suprisingly
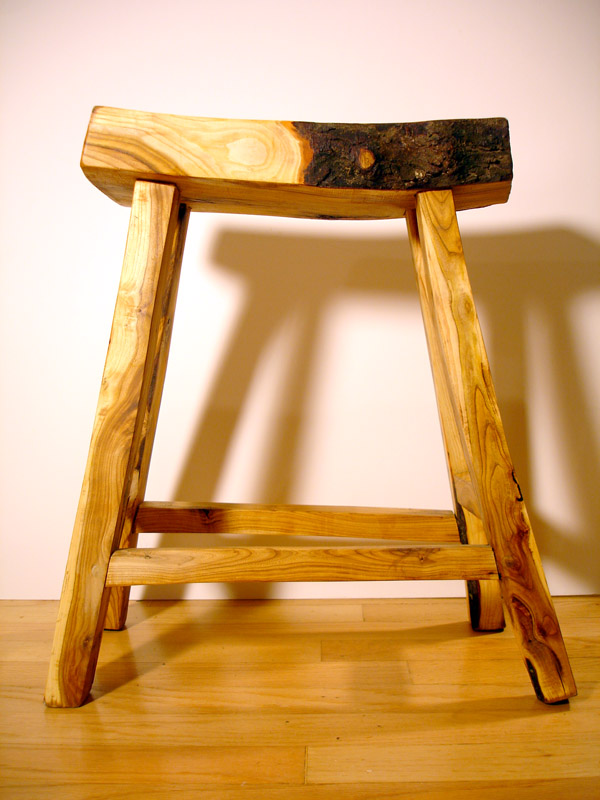
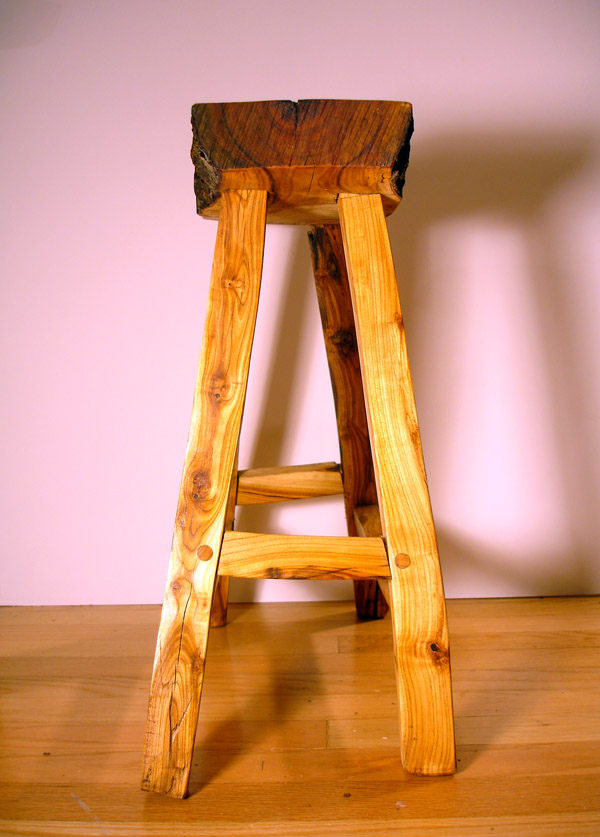
comfortable. Following is a stool I made out of the dripping wet wood
of a friend's recently felled redbud tree. Affecting an East African aesthetic.
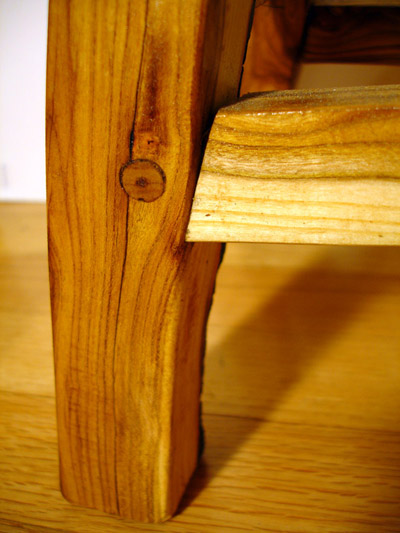
No glue, just pinned mortise and tenon construction.


And now for something completely the same. . .

This is the sum eventus of a dogwood tree that came down in our front yard a few weeks ago. After pondering a raft of projects that could be made from it, ranging from plantation chairs to firewood, I settled on making new bases for a series of primitive stools I had made for our tall dining room table. The original stools - not to go into too much detail - didn't turn out so well. I wish I had saved those poplar slabs for something else. But I digress. I reused the black painted tops, sawing them to half their thickness and thus turning 4 stools into potentially 8. Here's the process on the bases from log to finished product.
.jpg)
Future streachers
.jpg)
.jpg)
Spot the kindling
.jpg)
Fitting the mortise and tenon joints
.jpg)
Glue-up before pinning the tenons with dowels. The unpainted stripe around the top shows the reworking of the seat edge with a roundover bit. And the bottom being unpainted shows this was the top half of what was previously a seat that was twice this thick. These stools will be less top heavy. Waste not want not!
.jpg)
Lick of tung oil. Symmetry optional.
.jpg)
In situ at the dining room table. 2 down, 6 to go!
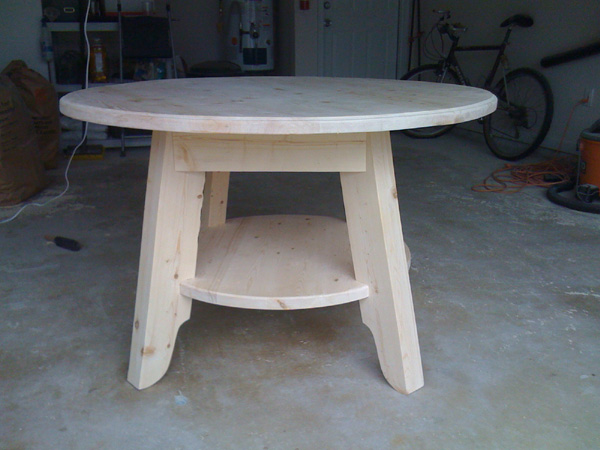
French
Provençal.
In the same vein as the rustic Scandinavian furniture I've made,
with simplified details and heftier proportions evoking the country craftsman's
take on the more purer form, here is a table that started life as a tapered-leg
Shaker-inspired design that has been cut down and restyled into something
French to better fit our inherited Louis XV cum Victorian cum 1950's sofa.
Besides needing to sit lower (I had a Shaker bench with an 18"H seat
with it previously which is now adorning our carport), it needed a style
makeover.
I chopped 3" off the legs and gave them a curve and pulled all the rails apart and copied the sofa's stretcher rail design. This poor table. It was made on the cheap originally, but I found I put those pinned tenons in there a little too well. Despite precautions, three of the mortises split out in removing the rails. Good thing it's getting painted!
.jpg)
A one-half template to be cut for the rails.
.jpg)
A modeled ochre paint job completes the look
And now for something completly the same. . .
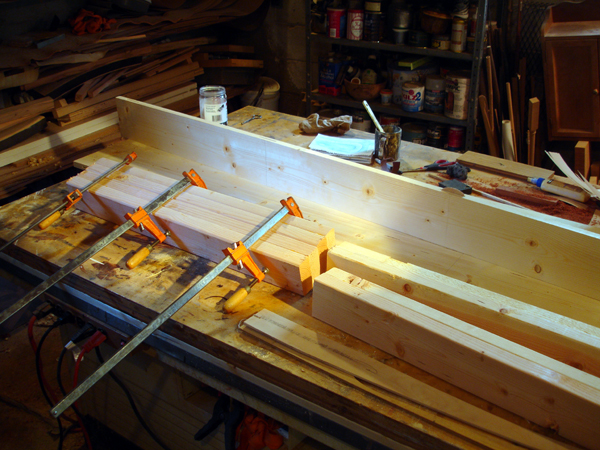
Gluing up 2x4's that have been dressed on one face
.jpg)
Joining the 1x6 top with biscuits
.jpg)
Using a template to mark out the legs and cutting on the bandsaw
.jpg)
Legs fine tuned with a bench sander and cleaned up with an orbital sander. Forstner bit used to start the mortise slots and one slot squared with hand chisels
.jpg)
.jpg)
Mortising
.jpg)
Determining the rail lengths by laying out the leg locations (determining the overhang)
.jpg)
The top gets cracks and knots covered with bondo to prevent bleed through the paint.
.jpg)
Cutting the rail profile. This is easier on the nerves when done with a jig saw, but faster with the bandsaw. I have made relief cuts along the curve to make it easier.
.jpg)
Huzzah.
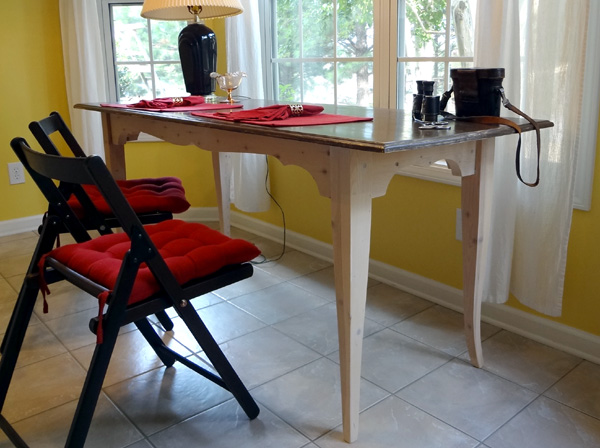
Finished: the top with a rubbed out brown paint and the base with a whitewash that looks like pickling.
Pipe Making.
Just for fun I'm making some tobacco pipes influenced by the
church warden style but with a turned (instead of carved) bowl
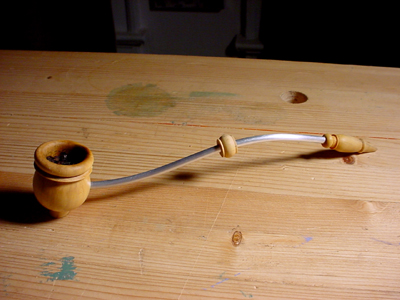
A tobacco pipe in boxwood. A 'key' is inserted into a blind hole in the bottom for holding the pipe while smoking. There is a temporary aluminum tube that will be replaced with stainless steel. This design is based on English 18thc. long pipes, but this is just a prototype and I haven't fully researched the style.
Visit my new pipemaking page for more recent adventures.
Box Making.
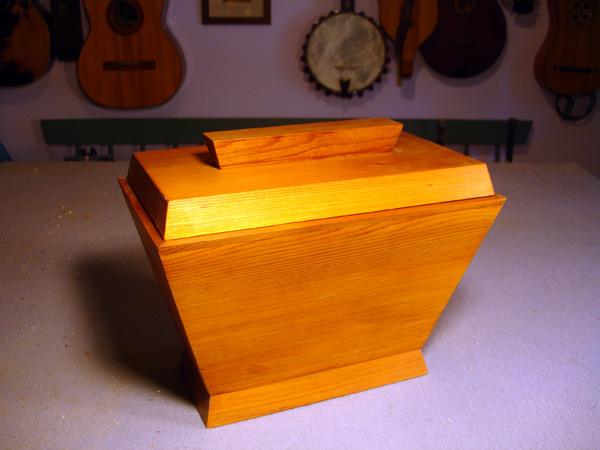
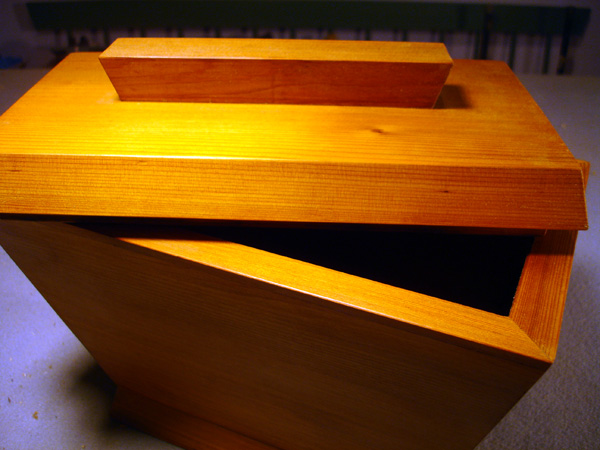
A box made out of an 18" cuttoff of a 6x12 cedar beam. A gift to a client from my architectural firm.
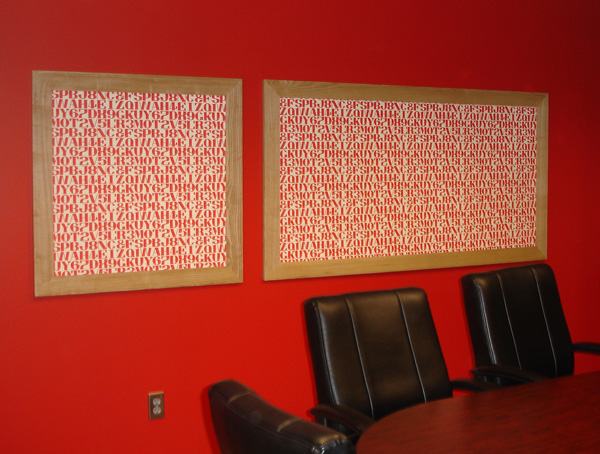
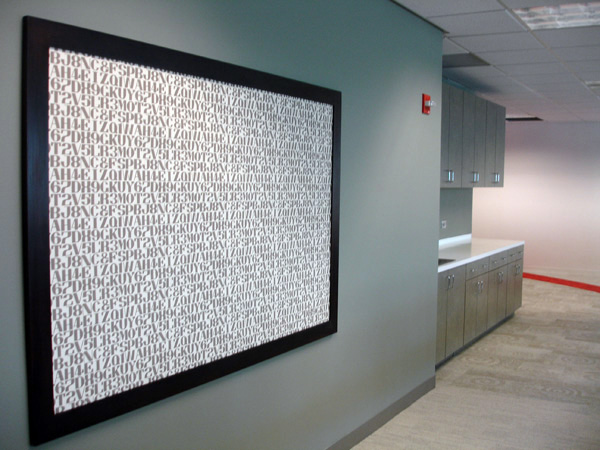
Frame
Making.
Occasionally I get furniture commissions (FF&E as we say
in the biz). These frames were made for an IT training company on a budget.
They didn't really have an art budget so this conference room and training
room were spiced up with large framed Maharam wallpaper panels. Idea/space
design courtesy of Insight Design.
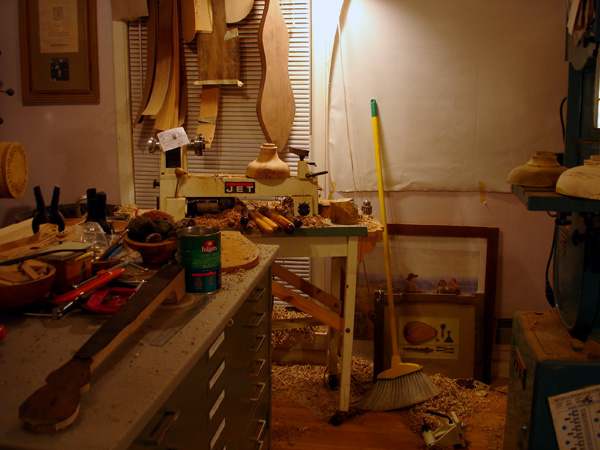
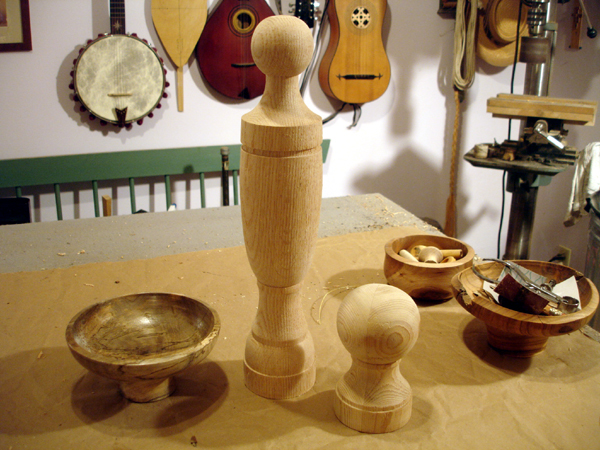
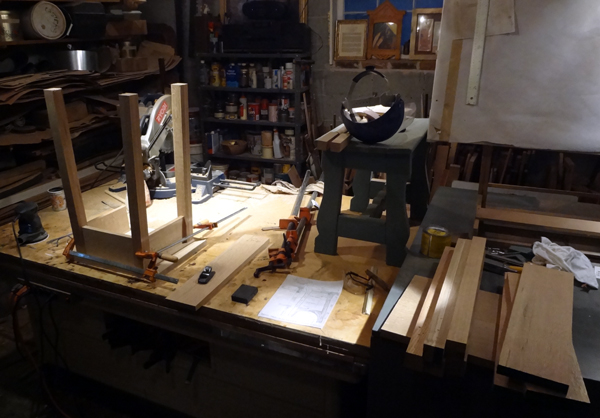
Tuesday, December 7, 2010: At the end of a long night of work, a shot for reflection on how much work I have going on at one time. From left to right: Banjo rim, baroque guitar body clamped in form, banjo neck in progress, bowls in progress on lathe and bandsaw, canvas taped to wall awaiting landscape cartooning. . . Not visible: renaissance cittern neck carving, strumstick body glue-up, dogwood stool leg mortising. This year's Christmas gift theme: "what can I make for you?"
The cheapest way to make bookshelves.
No, it's not plywood. . .description to come. . .
Bring it HOME.
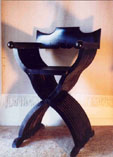
My version of the classic Savanarola chair of 15th c. Florence. Made for a college history course at the university workshops. Hours spent at the bandsaw cutting out the same s-shaped strut. Black lacquer finish.

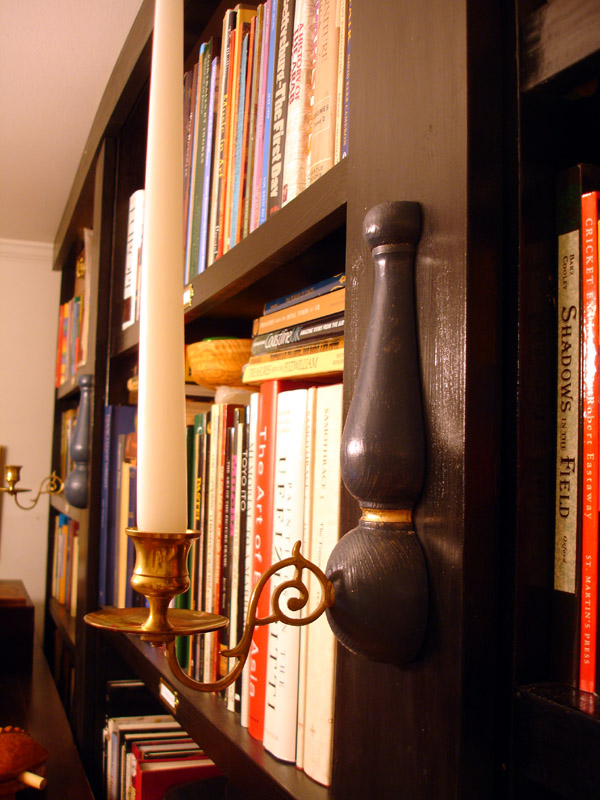
An open bookcase of my own design in the Arts-and-Crafts style. The top flips up to be a bookstand. In oak. Also visible in the shot is my Frei 7-course lute and one of my 'Edwardian' walking staffs.

A detail shot showing the Edwardian inspired decorative
bracket.
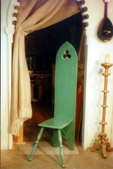
A vignette in my workshop with a gothic hall chair of my design and a torchere candle stand made hastily as a stage prop at university. The arched opening seperates my office space from the rest of the workshop and is designed as an interpretation of the woodwork found in the home of Ole Bull, the 19th c. Norwegian composer.
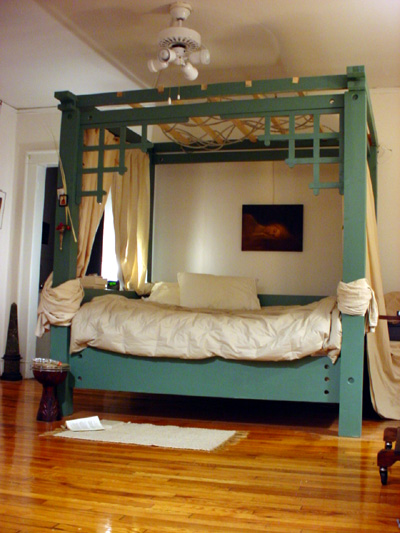
My quasi-Thai bed. This is a growing project. The basic four-post frame was made first, then the Chippendale-like brackets, then the canopy and drapery rods. Made from laminated and planed constuction pine and heavy as hell, but made for a pittance.

Paper mache masks. These are my interpretations of Venetian 'puncinello' mask tradition from the age of the Medici. Several layers of glue-laden newspaper are shaped over the form. Gesso is the white undercoat and the top finish is an airbrush applied pastiche.

A paper construction made in college, based on a first year Bauhaus corse from the Dessau years. The idea is to create a free-standing three-dimensional form from a sheet of paper by cutting and folding only with no wasteage.
A little Stone Mountain Chap:
And if America is to be a great nation this must become true. So let freedom ring from the prodigious hilltops of New Hampshire. Let freedom ring from the mighty mountains of New York. Let freedom ring from the heightening Alleghenies of Pennsylvania!
Let freedom ring from the snowcapped Rockies of Colorado!
Let freedom ring from the curvaceous slopes of California!
But not only that; let freedom ring from Stone Mountain of Georgia!
--Dr Martin Luther King Jr.
Here we found the Cowetas and Curates the the number of eleven waiting for us. While I was at Stony Mountain, I ascended the summit. It is one solid rock of curcular form about one mile across. Many strange tales are told by the Indians of the mountain. I have now passed all Indian settlements and shall only observe that the inhabitants of these countries appear very happy.
--Col. Marinus Willett, 1790
The country around had, at that time, barely passed into the hands of the white man, and there were few roads and fewer houses of accommodation. Our tent was pitched beside a spring near the mountain's base. From this point the rock rose majestically, with an almost perpendicular face of a thousand feet. We enjoyed its rough grandure almost as much by the soft light of the moon as we did by the red light of the setting sun.
--Rev. Francis Goulding, 1808
We found the summit as irregularly flat oval about a furlong in length. The view from it was supurb. Not another mountain could be seen in any direction within a distance of twenty-five or thirty miles. The country all around seemed to be an immense level, or rather a basin, the rim of which rose on all sides to meet the blue of the sky. To the east and south appeared a few clearings, but in every other direction the forest was unbroken
--Rev. Francis Goulding, 1808